Volume control isn’t working

In this guide, we show you how to replace your iPhone 6’s defective volume control cable on your own. You need this repair if your volume control buttons aren’t working or have no pressure points.

Required tools

  • For storing screws

    For storing screws

    We recommend storing your screws so you don’t mix up the various screws and small parts.

    from €10.99 on Amazon
  • Tweezers

    Tweezers

    We recommend using tweezers to remove screws and various small parts from your device.

    on Amazon
  • Pick Set

    Pick Set

    You need a flat but stable tool such as a pick to pry out parts that are glued in place.

    from €14.99 on Amazon
  • Plastic prying tool

    Plastic prying tool

    You need a flat plastic prying tool to disconnect the various plugs and connectors.

    from €14.99 on Amazon
  • Steel Laboratory Spatula

    Steel Laboratory Spatula

    You need a flat and sturdy prying tool to disconnect glued parts.

    on Amazon
  • Pentalobe PL1 screwdriver

    Pentalobe PL1 screwdriver

    You need the right screwdriver for removing pentalobe PL1 screws.

    on Amazon
  • Phillips PH00 screwdriver

    Phillips PH00 screwdriver

    You need the right screwdriver for removing PH00 screws.

    from €10.84 on Amazon

Required replacement part

Show all replacement parts for the iPhone 6 

Getting started with the repair of your iPhone 6

If you get stuck or have questions, you can post a comment. We’d be happy to help.

21 steps
  1. Turning off your Device

    iPhone 6 - Turning off your Device 01
    iPhone 6 - Turning off your Device 02
    1. Turn off your iPhone 6 completely to avoid damaging it during the repair.
    2. Press the standby button for about three seconds until the slider appears.
    3. Wipe it to completely shut down your iPhone. This can take about ten seconds.
  2. Removing the enclosure screws

    iPhone 6 - Removing the enclosure screws 01
    iPhone 6 - Removing the enclosure screws 02
    1. To open the iPhone 6 you should use a pentalobe screwdriver.
    2. On the lower side of the body you will find two Pentalobe screws. They are located left and right of the Lightning connector. Remove them and place them in one square on your magnetic pad.
      2 x 3.8 mm pentalobe screw
  3. Lifting the screen

    iPhone 6 - Lifting the screen 01
    iPhone 6 - Lifting the screen 02
    iPhone 6 - Lifting the screen 03
    1. Lay your iPhone 6 on a soft, clean surface to avoid scratches on the backcover.
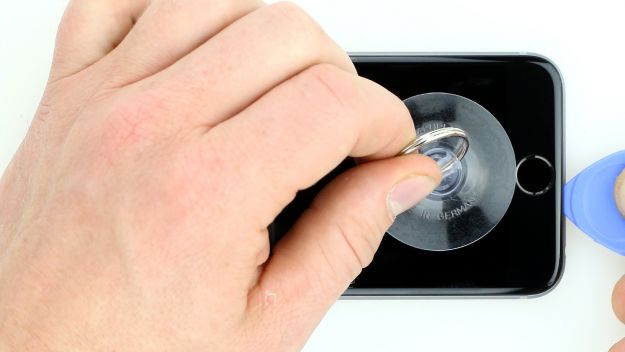
    2. With a suction cup and a hard plastic plectrum, you can lift the front screen of your iPhone 6. If the screen is heavily cracked, you should tape it entirely before lifting it. This way you can protect yourself from small glass splinters.
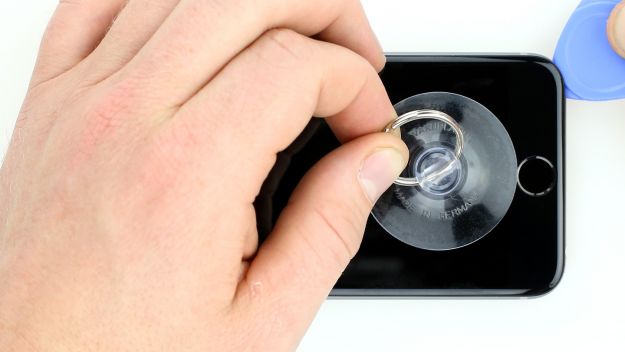
    3. Place the suction cup on the display - if possible directly above the Home button, alternatively next to it (see figure 1). Use the ring on the suction cup to lift the screen. At the same time, press the pletrum between the aluminium and display frame, pushing the aluminium frame downwards. This way you can lift the screen with the plectrum (see figure 2). This step requires some patience - you will probably need several attempts.
    4. When you have succeeded and the display can be lifted a little bit, work your way carefully on the outside until the two long sides are loosened (see figure 3).
  4. Disconnecting the battery connector

    iPhone 6 - Disconnecting the battery connector 01
    iPhone 6 - Disconnecting the battery connector 02
    iPhone 6 - Disconnecting the battery connector 03

    After lifting the screen you should disconnect the battery contact. This way you can avoid a short circuit during the repair. It also helps ensure that your device does not accidentally turn on during repairs.


    1. Use a Phillips screwdriver to remove the Phillips screws that are attached to the battery connector (see figure 1). Take off the cover (see figure 2) and put all parts in the same container.
      1 x 3.2 mm Phillips screw
      1 x 2.3 mm Phillips screw
    2. Now carefully remove the battery connector. To do this, use the sharp end of the ESD spudger - go very gently under the plug (see figure 3). You do not have a spudger available? You can also try to remove the plug with your fingernail.
  5. Disconnecting the display connectors

    iPhone 6 - Disconnecting the display connectors 01
    iPhone 6 - Disconnecting the display connectors 02
    1. The silver cover is fixed with five Phillips screws. Remove them (see figure 1) and place the screws in one section of the magnetic pad. Then you can remove the cover.
      1 x 3.1 mm Phillips screw
      3 x 1.3 mm Phillips screw
      1 x 1.8 mm Phillips screw
    2. Now you see four overlapping connectors (see picture 2). Loosen them very carefully in the order shown below. To do this, gently go under the contact with the pointed side of the spudger and lift it up.
      Front camera/sensor/earpiece/ambient microphone
      Touch ID cable
      LCD
      Touchscreen
  6. Removing the vibration motor

    iPhone 6 - Removing the vibration motor 01
    iPhone 6 - Removing the vibration motor 02
    1. Pull out the two screws that fix the vibration motor (see figure 1).
      2 x 1.5 mm Phillips screw
    2. Now you can take out the vibration motor (see figure 2).
  7. Removing the battery

    iPhone 6 - Removing the battery 01
    iPhone 6 - Removing the battery 02
    iPhone 6 - Removing the battery 03
    1. The battery sits firmly in the body due to two adhesive strips. With your spatula you can loosen the two black ends of these from the battery (see figure 1).
    2. Now remove the adhesive strips. Therefore you have to work very slowly and keep the strips as flat as possible, at the height of the iPhone (See figures 2 and 3).
    3. Now take off the battery from the iPhone 6.
  8. Removing the silver cover

    iPhone 6 - Removing the silver cover 01
    iPhone 6 - Removing the silver cover 02
    1. First remove the two Phillips screws from the silver cover (see figure 1). Put both screws in the same container. Then lift the cover to remove it (see figure 2).
      1 x 2.2 mm Phillips screw
      1 x 2.9 mm Phillips screw
  9. Removing the Wi-Fi cover

    iPhone 6 - Removing the Wi-Fi cover 01
    iPhone 6 - Removing the Wi-Fi cover 02
    1. First remove the four Phillips screws from the Wi-Fi cover (see figure 1). Put the screws in the same container. Then lift the cover to remove it (see figure 2).

      2 x 2.1 mm Phillips screw
      1 x 1.3 mm Phillips screw
      1 x 1.6 mm Phillips screw
  10. Disconnecting the connector

    iPhone 6 - Disconnecting the connector 01
    1. Disconnect the connector for the volume control cable (see figure 1).
  11. The right tools for your repair

    With the right tools, you will succeed in any repair. In our store you will find a large selection of professional quality tools.
    VIEW NOW
  12. Removing the volume control cable

    iPhone 6 - Removing the volume control cable 01
    iPhone 6 - Removing the volume control cable 02
    iPhone 6 - Removing the volume control cable 03
    iPhone 6 - Removing the volume control cable 04
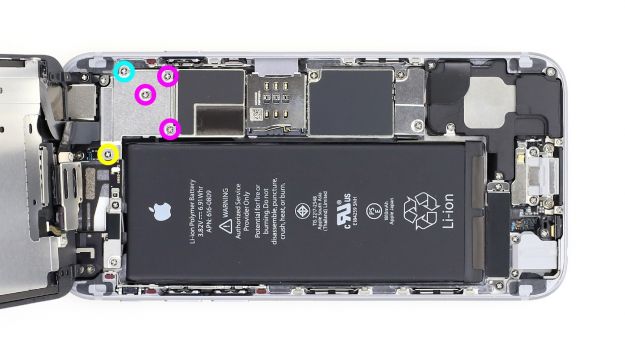
    1. Remove the three Phillips screws that hold the volume control cable in place using a Phillips screwdriver (see figure 1). Because of the logic board’s position, you can only loosen the screw on the right in the turquoise circle (see figure 2), but not remove it. You remove this screw when you take out the cable set.
      2 x 2.2 mm Phillips screw
      1 x 1.8 mm Phillips screw
    2. Insert the laboratory spatula below the ribbon cable and carefully detach it from the base (see figure 3).
    3. Remove the volume control cable along with the screw we mentioned before (see figure 4).
      If you can’t remove the screw as described, you’ll have to remove the logic board first (see our guide on how to do that).
  13. Installing the volume control cable

    iPhone 6 - Installing the volume control cable 01
    iPhone 6 - Installing the volume control cable 02
    iPhone 6 - Installing the volume control cable 03
    1. Put the new volume control cable in the original position and screw it in place with the three Phillips screws (see figure 1). Be very gentle and careful when screwing in the 1.8 mm Phillips screw.
      2 x 2.2 mm Phillips screw
      1 x 1.8 mm Phillips screw
      Unfortunately, if you can’t get the screw on the far right (see figure 2) back in, you’re going to have to remove the logic board to solve the problem.
    2. Afterwards, attach the connector for the volume control cable to the logic board.
  14. Installing the Wi-Fi cover

    iPhone 6 - Installing the Wi-Fi cover 01
    1. Now install the Wi-Fi cover and screw it in place (see figure 1).
      2 x 2.1 mm Phillips screw
      1 x 1.3 mm Phillips screw
      1 x 1.6 mm Phillips screw
  15. Installing the silver cover

    iPhone 6 - Installing the silver cover 01
    iPhone 6 - Installing the silver cover 02
    1. Now install the silver cover (see figure 1) and screw it in place with the two Phillips screws (see figure 2).
    2. 1 x 2.2 mm Phillips screw
      1 x 2.9 mm Phillips screw

  16. Installing the battery

    iPhone 6 - Installing the battery 01
    1. Now attach new adhesive strips on the bottom of the battery so that it does not move in the future.
    2. Insert the battery into iPhone, but don't connect it with your device to avoid a possible short circuit.
  17. Installing the vibration motor

    iPhone 6 - Installing the vibration motor 01
    iPhone 6 - Installing the vibration motor 02
    1. Put the vibration motor back in its original place (see figure 1).
    2. Fix the component with the appropriate screws (see figure 2).
      2 x 1.5 mm Phillips screw
  18. Connecting the display

    iPhone 6 - Connecting the display 01
    iPhone 6 - Connecting the display 02
    1. Now attach the LCD connector (see figure 1). This usually requires several attempts. So no worries if it does not work the first time. However, it is important that you are extremely careful in your attempts so that the plug cannot be bent.
      Front camera/sensor/earpiece/ambient microphone
      Touch ID cable
      LCD
      Touchscreen
    2. When the connectors are attached securely, you can turn on your iPhone 6 again! Run a few functional tests and see if the LCD, touch screen, proximity sensor, front camera and earcup still work.
      If you see streaks on the display or the touchscreen is partially not working, the connectors are not connected properly.
    3. Put the cover on the connectors and fix it with the five screws (see figure 2).
      1 x 3.1 mm Phillips screw
      3 x 1.3 mm Phillips screw
      1 x 1.8 mm Phillips screw
  19. Connecting the battery

    iPhone 6 - Connecting the battery 01
    iPhone 6 - Connecting the battery 02
    iPhone 6 - Connecting the battery 03
    1. Now it's time to connect the battery again.
    2. Put the silver cover into the case and fix it with the screws.
      1 x 3,2 mm Phillips-Schraube
      1 x 2,3 mm Phillips-Schraube
  20. Attaching the display

    iPhone 6 - Attaching the display 01
    1. You're nearly there! Carefully put the display back into the housing. Be careful not to pinch any cables and make sure that the edge at the top of the screen really clicks into place.
    2. Now carefully push your screen on towards the home button so that it fits correctly in the frame.
  21. Fastening the enclosure screws

    iPhone 6 - Fastening the enclosure screws 01
    1. Take the last remaining Pentalobe screws and insert them into the lower side of the body.
      2 x 3.8 mm pentalobe screw
  22. Setting the time

    iPhone 6 - Setting the time 01

    Because the battery was disconnected from the iPhone 6 for a while, it is possible that the time is no longer set correctly and is now automatically set to "1:00 am 1/1/1970". This may cause problems with the connection to the cellular network.

    Connect your iPhone 6 to a wireless network to resolve this potential problem. When your device is connected to the Internet again, the time should reset itself. If it doesn't, try removing and reinserting the SIM card. Alternatively, it may help to turn Flight Mode on and off.

Ø 4.7 (14 Ratings)

Bewerte unsere Anleitung

Hat dir unsere Anleitung weitergeholfen? Wir sind auf deine Beurteilung gespannt.

Submit rating

Submit rating

How did you like this repair guide?

Exceptional

Similar guides

You might also be interested in these guides.

You might be interested in

Get in touch with iDoc
Please contact our customer service for any questions about iDoc's products and services.

  • Send a message

    If you have a question about a guide or want to give us general feedback, just use our contact form

    Write a message
  • Free shipping

    From a minimum order value of 79.00 € your order will be shipped free of charge within Germany.

  • Call iDoc

    If you have any questions about our guides or services, call us from Monday to Friday, 10:00 a.m. to 6:00 p.m.

    +49 30 200 514 455
  • 5 star service

    We offer top quality and service. Our customers confirm this as well.

    Show reviews

Profi-Insights & Tipps für deine erfolgreiche Handy-Reparatur

iDoc schenkt dir den ultimativen Reparatur-Guide GUIDE GRATIS ANFORDERN

Profi-Insights & Tipps für deine erfolgreiche Handy-Reparatur

iDoc schenkt dir den ultimativen Reparatur-Guide GUIDE GRATIS ANFORDERN