Your Galaxy A80 is constantly empty and the battery capacity is low.

You just charged your phone and yet the battery is already empty again? Use these instructions to replace the defective battery of your Samsung Galaxy A80 on your own and to give your faithful companion new power.

The battery replacement is recommended if your phone doesn't last long any more or simply switches off when the battery level is low.

To repair the battery, open the Galaxy A80 via the glued back cover and remove a few components from the unit until the battery can be removed. We will guide you through the repair step by step and also show you how to reassemble the device after the new battery has been installed.

If you have any questions and are stuck at a certain point, you can always contact our support via the chat and comment function. We will gladly help you with any problems.

Required tools

  • Tool for prying out batteries

    Tool for prying out batteries

    You have to use a very stable tool to pry out the battery. At the same time, it has to be flat enough to insert below the battery.

    from €10.99 on Amazon
  • Flat Picks

    Flat Picks

    You need a very flat tool such as a flat pick to pry out parts that are glued in place.

    from €11.95 on Amazon
  • Heat gun

    Heat gun

    You can use a heat gun to heat parts that are glued on so they’re easier to remove. In most cases, you can also use a hairdryer.

    from €15.99 on Amazon
  • iFlex Opening Tool

    iFlex Opening Tool

    Opening your smartphone can be a very delicate operation, especially if the glue is very persistent. The blade of the flexible but sturdy iFlex measures just 0.15 mm, so it fits in even the smallest gaps, such as between the screen and the frame. The practical iFlex is made of stainless steel and sits comfortably in the hand. This makes it the perfect assistant for every smartphone repair.

    from €10.95 on Amazon
  • iPlastix Opening Tool

    iPlastix Opening Tool

    Do you want to open your smartphone or lever out large parts like the battery? Then the iPlastix with its large blade will help you. The practical assistant is made of flexible, especially sturdy plastic and lies comfortably in the hand. Thanks to its design, you can even get into smaller gaps, for example to lift the screen or to prevent it from sticking together again.

    on Amazon
  • iSclack evo Opening Tool

    iSclack evo Opening Tool

    Opening your device can be a real test of patience, when the screen or back of your phone is glued very strong. With an iSclack evo, you can simplify the process. The pincer-like handle allows you to create a gap between the screen and the frame with minimal effort. At the same time, you have the other hand free to use a narrow tool such as a plectrum or the iFlex to enlarge the gap. The included cover foils allow you to use the iSclack evo even if the screen is splintered.

    on Amazon
  • For storing screws

    For storing screws

    We recommend storing your screws so you don’t mix up the various screws and small parts.

    from €10.99 on Amazon
  • SIM Tool

    SIM Tool

    If you want to use a different SIM card or repair most parts of your Apple devices, you’ll have to remove the SIM card first. The SIM card tray only comes out if you insert a tool with a very fine point into the small hole next to the SIM card slot. This tool is designed especially for ejecting the SIM card from all iPhones and iPads, and fits perfectly into the appropriate opening.

    on Amazon
  • Plastic prying tool

    Plastic prying tool

    You need a flat plastic prying tool to disconnect the various plugs and connectors.

    from €14.99 on Amazon
  • Phillips PH00 screwdriver

    Phillips PH00 screwdriver

    You need the right screwdriver for removing PH00 screws.

    from €10.84 on Amazon
Show all replacement parts for the Galaxy A80 

Getting started with the repair of your Galaxy A80

If you get stuck or have questions, you can post a comment. We’d be happy to help.

11 steps
  1. Remove the back cover

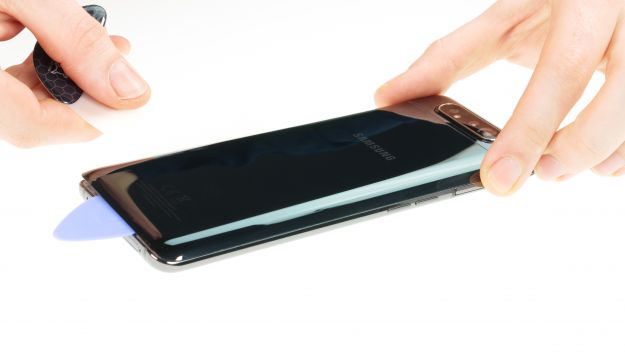
    The first step is to loosen the heavily glued backcover. To loosen the back cover, the edge of the unit should be heated with hot air. A temperature of about 60 to 80 degrees is recommended. It should still be possible to touch the device with bare fingers without it being too hot.

    1. When the adhesive is heated, place a suction cup at the bottom of the back cover. Slowly pull on the suction cup while pushing your opening tool such as the iFlex or iPlastix into the gap that is opening between the backcover and the frame.
    2. You can also use an iSclack to help lift the back cover a little. The iSclack has suction cups on two sides to pull the display and back cover evenly.

    The iFlex is made of thin yet stable metal and is therefore easier to insert into the narrow gap. However, it is also easier to scratch the back glass or the frame of the device with this tool.The iPlastix is made of plastic, slightly more flexible than the iFlex and therefore a little more difficult to insert into the gap. The iFlex can be used initially to get into the gap at first. After that, you can continue working with the plastic tool.

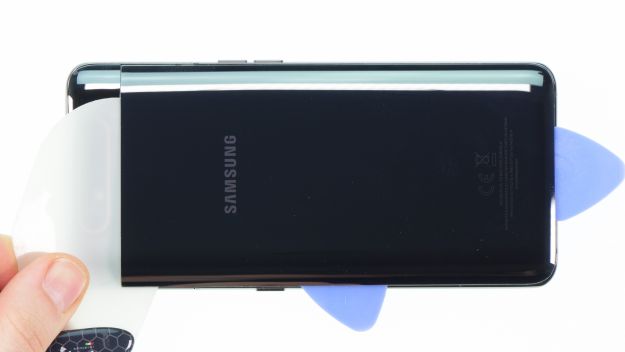
    1. Once the tool is inserted, slide it along the edge of the frame. Then gradually place a flat plectrum into the already detached part. This will prevent the glue from rejoining at these points.
    At the left edge of the back cover you should be careful not to insert your tool too far into the device. There is a flex cable running along, which could otherwise be easily damaged. In the upper part of the back cover you should be careful not to scratch along the camera module. The backcover is very heavily glued in this area.

    The back cover is made of glass and can therefore break easily. Take enough time for this step and work carefully. Also warm up the frame from time to time. It can take 30 minutes to loosen such a strongly glued backcover.

  2. Remove the main board cover

    Galaxy A80 - Remove the main board cover 01
    Galaxy A80 - Remove the main board cover 02
    Galaxy A80 - Remove the main board cover 03
    Galaxy A80 - Remove the main board cover 04
    Galaxy A80 - Remove the main board cover 05
    • 6 × 3,3 mm Phillips

    The NFC antenna is also located on the cover of the main board.

    1. To remove the main board cover, the camera must first be extended.
    2. Start your camera app and set the mode to front camera mode.
    3. When the camera module is completely extended, you can remove the six Phillips screws of equal length.

    The camera will automatically slide down again after some time, so you should start unscrewing the screws directly after moving the camera out.

    1. Then use a plastic spudger to slightly lift the cover in several places and take it out.
  3. Disconnect the battery

    Galaxy A80 - Disconnect the battery 01
    Galaxy A80 - Disconnect the battery 02
    • Battery Connector
    1. Next, the battery contact is disconnected. This prevents any further power from circulating in the device and prevents short-circuits during the repair.

    Make sure that the camera module is still extended when you disconnect the battery contact. This will keep the camera in this position for the rest of the repair.

    1. Separate the connector with a plastic spudger. Always lever from the side where there are no small components on the board to avoid damaging anything.
  4. Remove the speaker

    • 7 × 3,9 mm Phillips
    • Connector
    1. Loosen the seven Phillips screws of the same length that hold the speaker in place.
    2. Then lever the slightly glued component out of the unit.

    Now the connectors of the wide flex cable connecting the main board with the USB board are exposed.

    1. Loosen the connectors with a plastic tool and take the cable out.
  5. Remove the battery

    1. The battery is glued very strongly into the device. To remove the battery, the adhesive must be warmed up.

    Never heat the battery directly, but always from the side of the display.

    1. You can simply flip the appliance over or you can place the heat gun on the table and hold the unit over it.
    2. Then lever the battery out of the device gradually with a wide and stable tool such as the battery spudger.
    3. You can also use a flat tool made of plastic to try to get under the battery bit by bit.
    Here, too, it is better to heat up more often and work carefully. You should definitely avoid bending the battery or damaging its case.

    Do not lever in the upper part of the battery, as the battery controller is located in this area.


  6. The right tools for your repair

    With the right tools, you will succeed in any repair. In our store you will find a large selection of professional quality tools.
    VIEW NOW
  7. Insert the battery

    Galaxy A80 - Insert the battery 01
    1. Now insert your new battery back into the device.
    2. You can use the glue left in the device to reattach your new battery. Make sure that the glue does not wrinkle and remove glue from such places if necessary.

    Remove all old glue from your device if your battery has new adhesive surfaces.

    1. If there is not enough glue left in the device and your new battery does not have any adhesive surfaces, you can also use thin double-sided adhesive tape.
    2. When inserting the battery, make sure that there is enough room on all sides.
  8. Insert the speaker

    Galaxy A80 - Insert the speaker 01
    Galaxy A80 - Insert the speaker 02
    Galaxy A80 - Insert the speaker 03
    Galaxy A80 - Insert the speaker 04
    • Connector
    • 7 × 3,9 mm Phillips
    1. Put the wide flex cable back into the device and connect it to the main board and the USB board.
    2. Place the speaker back in the device, press it down slightly and screw it in.
  9. Connect the battery

    Galaxy A80 - Connect the battery 01
    Galaxy A80 - Connect the battery 02
    • Battery Connector
    1. Now connect the battery to the mainboard.
  10. Insert the main board cover

    Galaxy A80 - Insert the main board cover 01
    Galaxy A80 - Insert the main board cover 02
    Galaxy A80 - Insert the main board cover 03
    Galaxy A80 - Insert the main board cover 04
    • 6 × 3,3 mm Phillips
    1. Place the cover of the main board on the right side and then press it into position.
    2. Make sure that the small plastic noses on both sides snaps back into place.
    3. Then you can fasten the cover.
  11. Test your Galaxy A80

    Galaxy A80 - Test your Galaxy A80 01
    Galaxy A80 - Test your Galaxy A80 02
    Galaxy A80 - Test your Galaxy A80 03
    Galaxy A80 - Test your Galaxy A80 04
    Galaxy A80 - Test your Galaxy A80 05
    1. Before you completely close your Samsung Galaxy A80 again and reglue the back cover, you should test if everything works.
    2. Start the phone and open the phone app.
    3. Enter *#0*# in the number field and the Samsung test menu will open.
    4. Here you can test the display for touch and display errors.
    5. You can also test all other functions, such as the speaker, vibration motor, etc.
    6. If everything works as expected, you can close the device.
  12. Attach the back cover

    1. Remove all remaining adhesive from the inside of the back cover and from the frame of the device. You can scrape off the remains with a plastic tool, like a spudger. You can also use rubbing alcohol such as isopropanol and a lint-free cloth. You should remove all adhesive residue so that the device can be closed properly.
    2. Take the new adhesive frame and check the correct alignment. You can orient yourself on different recesses and screw holes.
    3. Pull off the first transparent protective film and place the adhesive on the frame so that it sits correctly and does not protrude anywhere.
    4. Then remove the green protective foil. If the glue comes off the frame in some places, press it back into position with a spudger.
    5. Then put on the back cover and press it down.
    6. You can heat the edge of the device again with the heat gun and weigh it down with a few books to make the adhesive bond even better.
Ø 0 (0 Ratings)

Bewerte unsere Anleitung

Hat dir unsere Anleitung weitergeholfen? Wir sind auf deine Beurteilung gespannt.

Submit rating

Submit rating

How did you like this repair guide?

Exceptional

Similar guides

You might also be interested in these guides.

You might be interested in

Get in touch with iDoc

Please contact our customer service for any questions about iDoc's products and services.

  • Send a message

    If you have a question about a guide or want to give us general feedback, just use our contact form

    Write a message
  • Free shipping

    From a minimum order value of 79.00 € your order will be shipped free of charge within Germany.

  • Call iDoc

    If you have any questions about our guides or services, call us from Monday to Friday, 10:00 a.m. to 6:00 p.m.

    +49 30 200 514 455
  • 5 star service

    We offer top quality and service. Our customers confirm this as well.

    Show reviews

Profi-Insights & Tipps für deine erfolgreiche Handy-Reparatur

iDoc schenkt dir den ultimativen Reparatur-Guide GUIDE GRATIS ANFORDERN

Profi-Insights & Tipps für deine erfolgreiche Handy-Reparatur

iDoc schenkt dir den ultimativen Reparatur-Guide GUIDE GRATIS ANFORDERN